How to change the logo on your Handover Certificate

How to change the logo on your handover certificate

Your company logo appears on every handover certificate Scafflinq generates. You can replace it at any time from your organization settings — it takes about a minute.

Who can do this: Company Admins only. If you can't find the Handover Certificates section described below, your account doesn't have the right permission level. Ask a Company Admin at your organization to make the change for you.

Before you start: prepare your logo file

Getting the file right first makes the rest of this quick.


Accepted formats

JPG, JPEG, PNG, WEBP, GIF

Maximum file size

5 MB

Recommended dimensions

600 × 600 pixels or smaller

A few tips:

  • A PNG with a transparent background usually looks best, since it sits cleanly on the white certificate page.

  • Keep the image close to the recommended 600 × 600 size. Very large images make your certificate PDFs slower to generate and heavier to email, and they won't look any sharper on the finished document.

  • Vector and document files aren't supported. If your logo is an SVG, PDF, or EPS — which is common when it comes straight from a designer — export it as a PNG first.

To check your logo's dimensions:

  • Windows — right-click the file → PropertiesDetails

  • Mac — right-click the file → Get Info

To resize, use Paint on Windows (ResizePixels) or Preview on Mac (ToolsAdjust Size).

Step 1: Open your settings

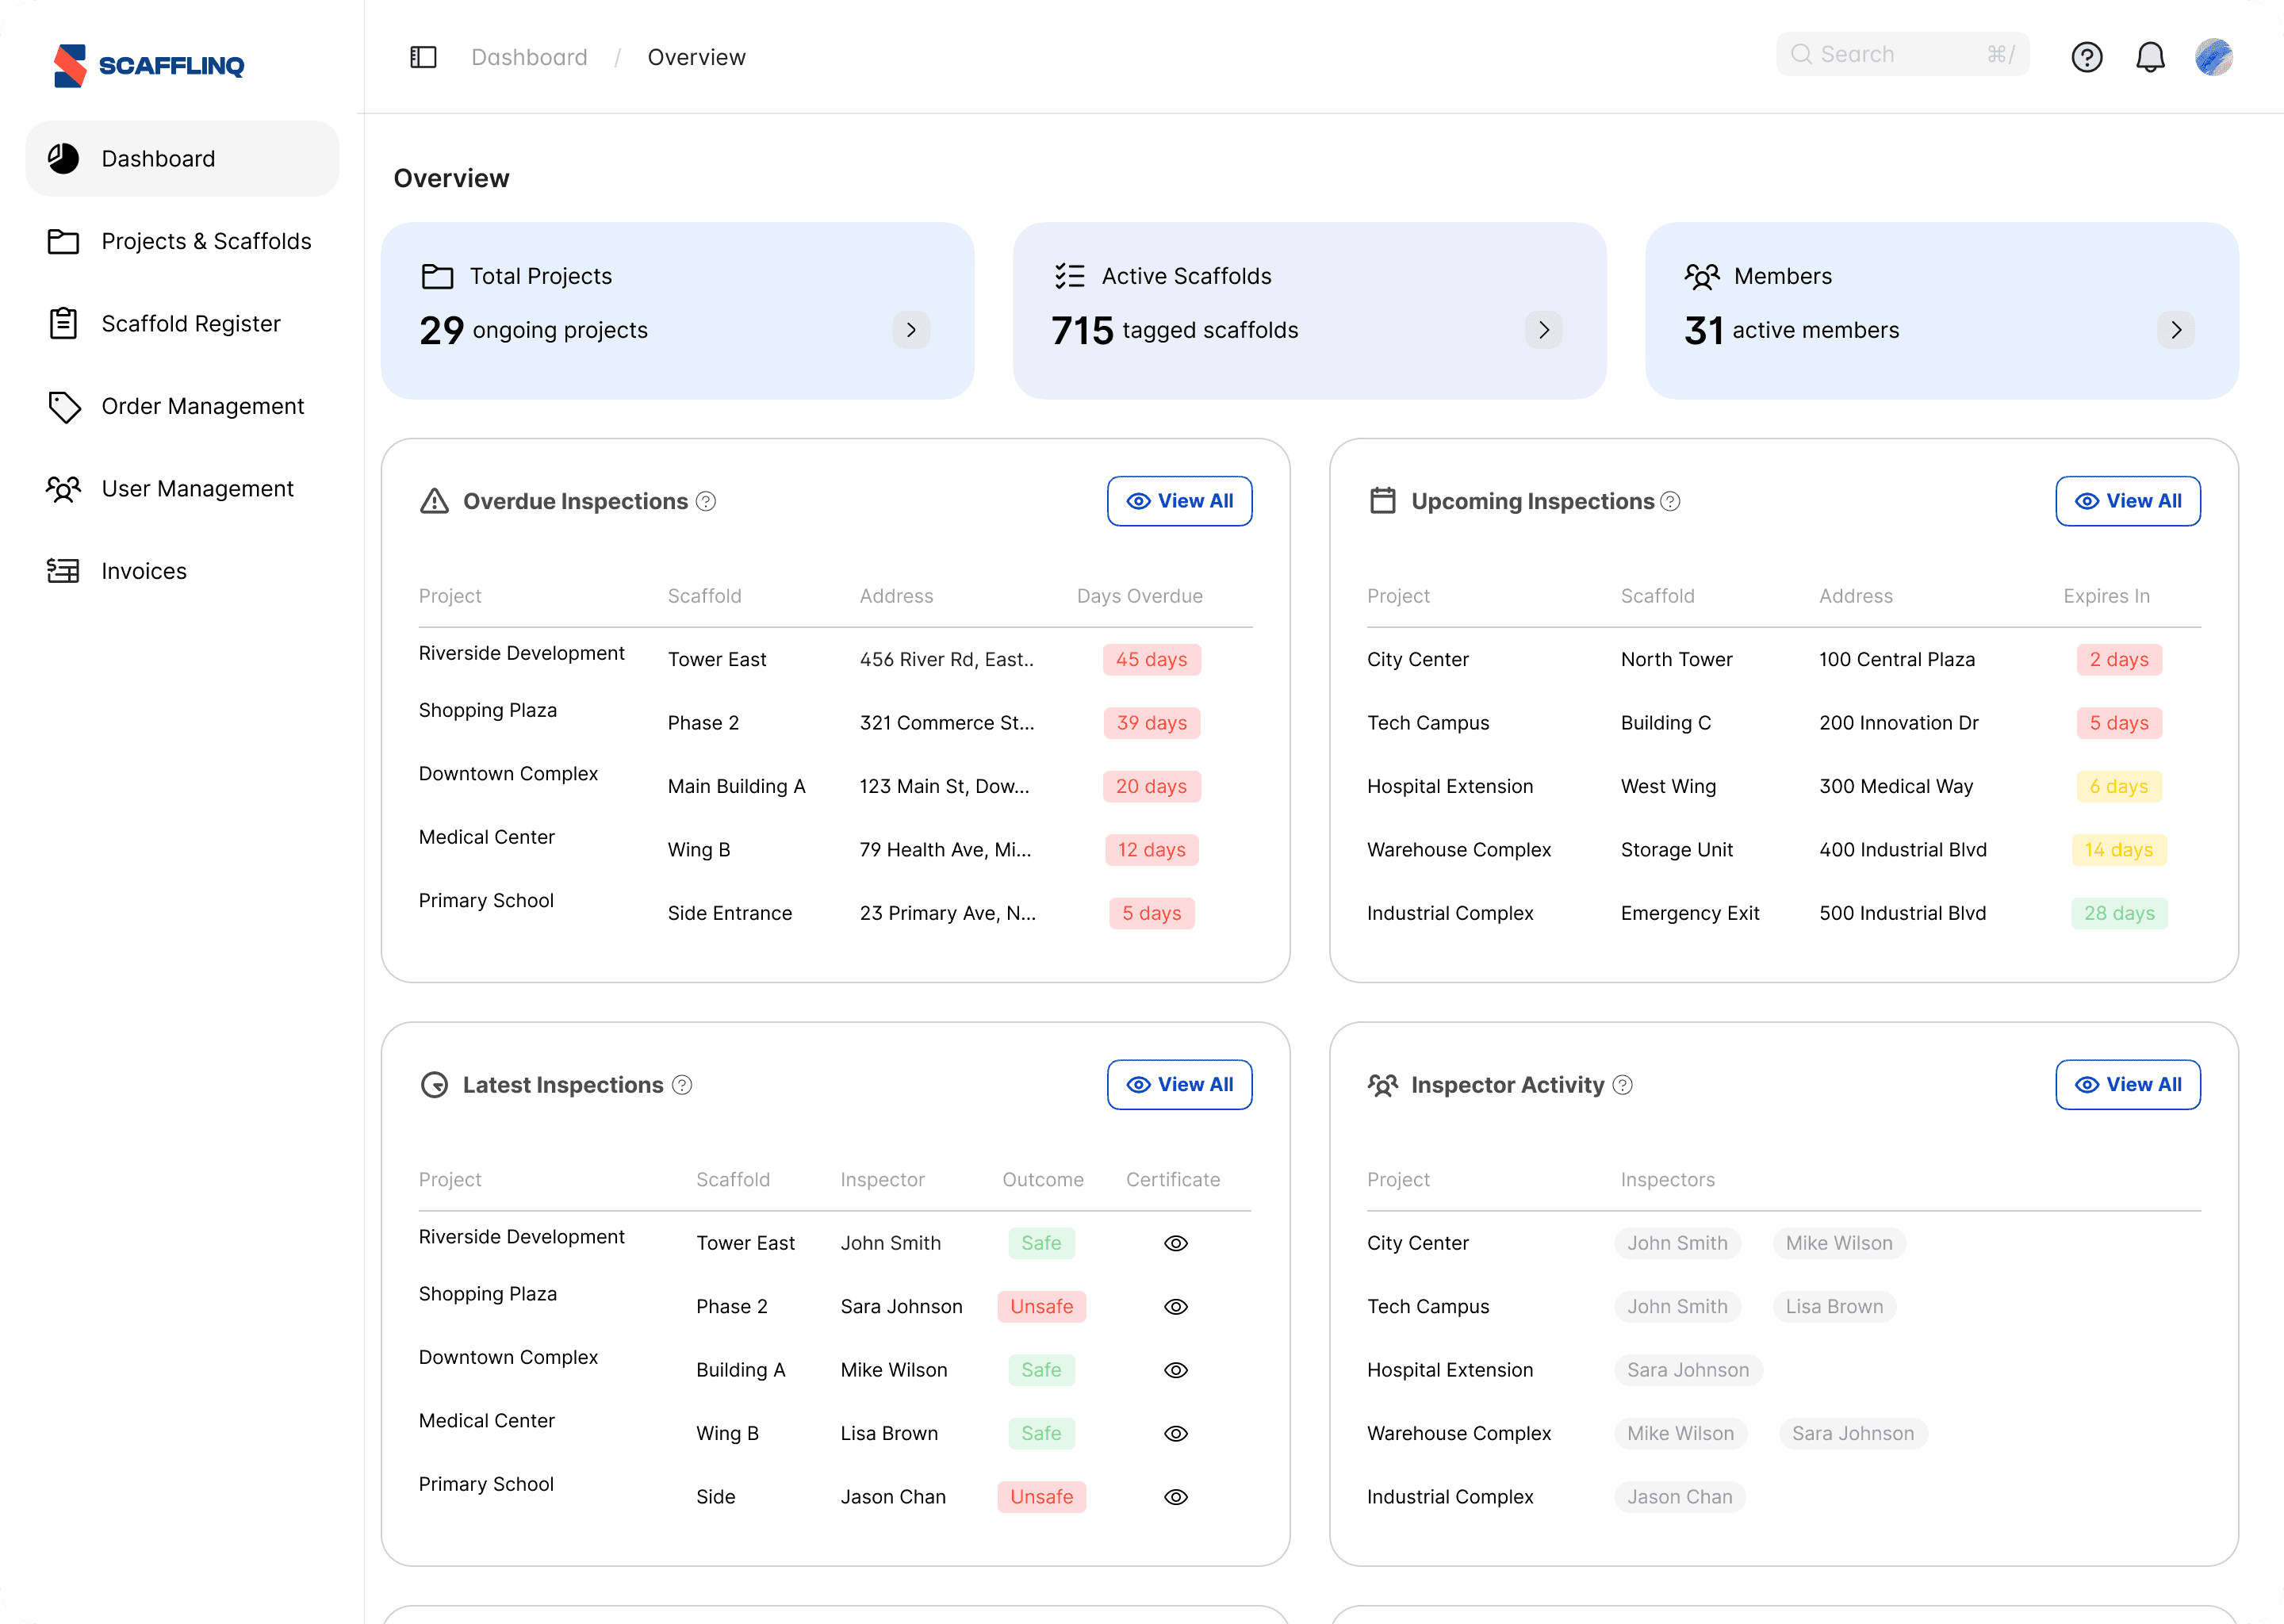
From anywhere in the Scafflinq dashboard, click the gear icon in the top-right of the header — it sits between the help (?) icon and your profile initial.

Step 2: Go to Handover Certificates

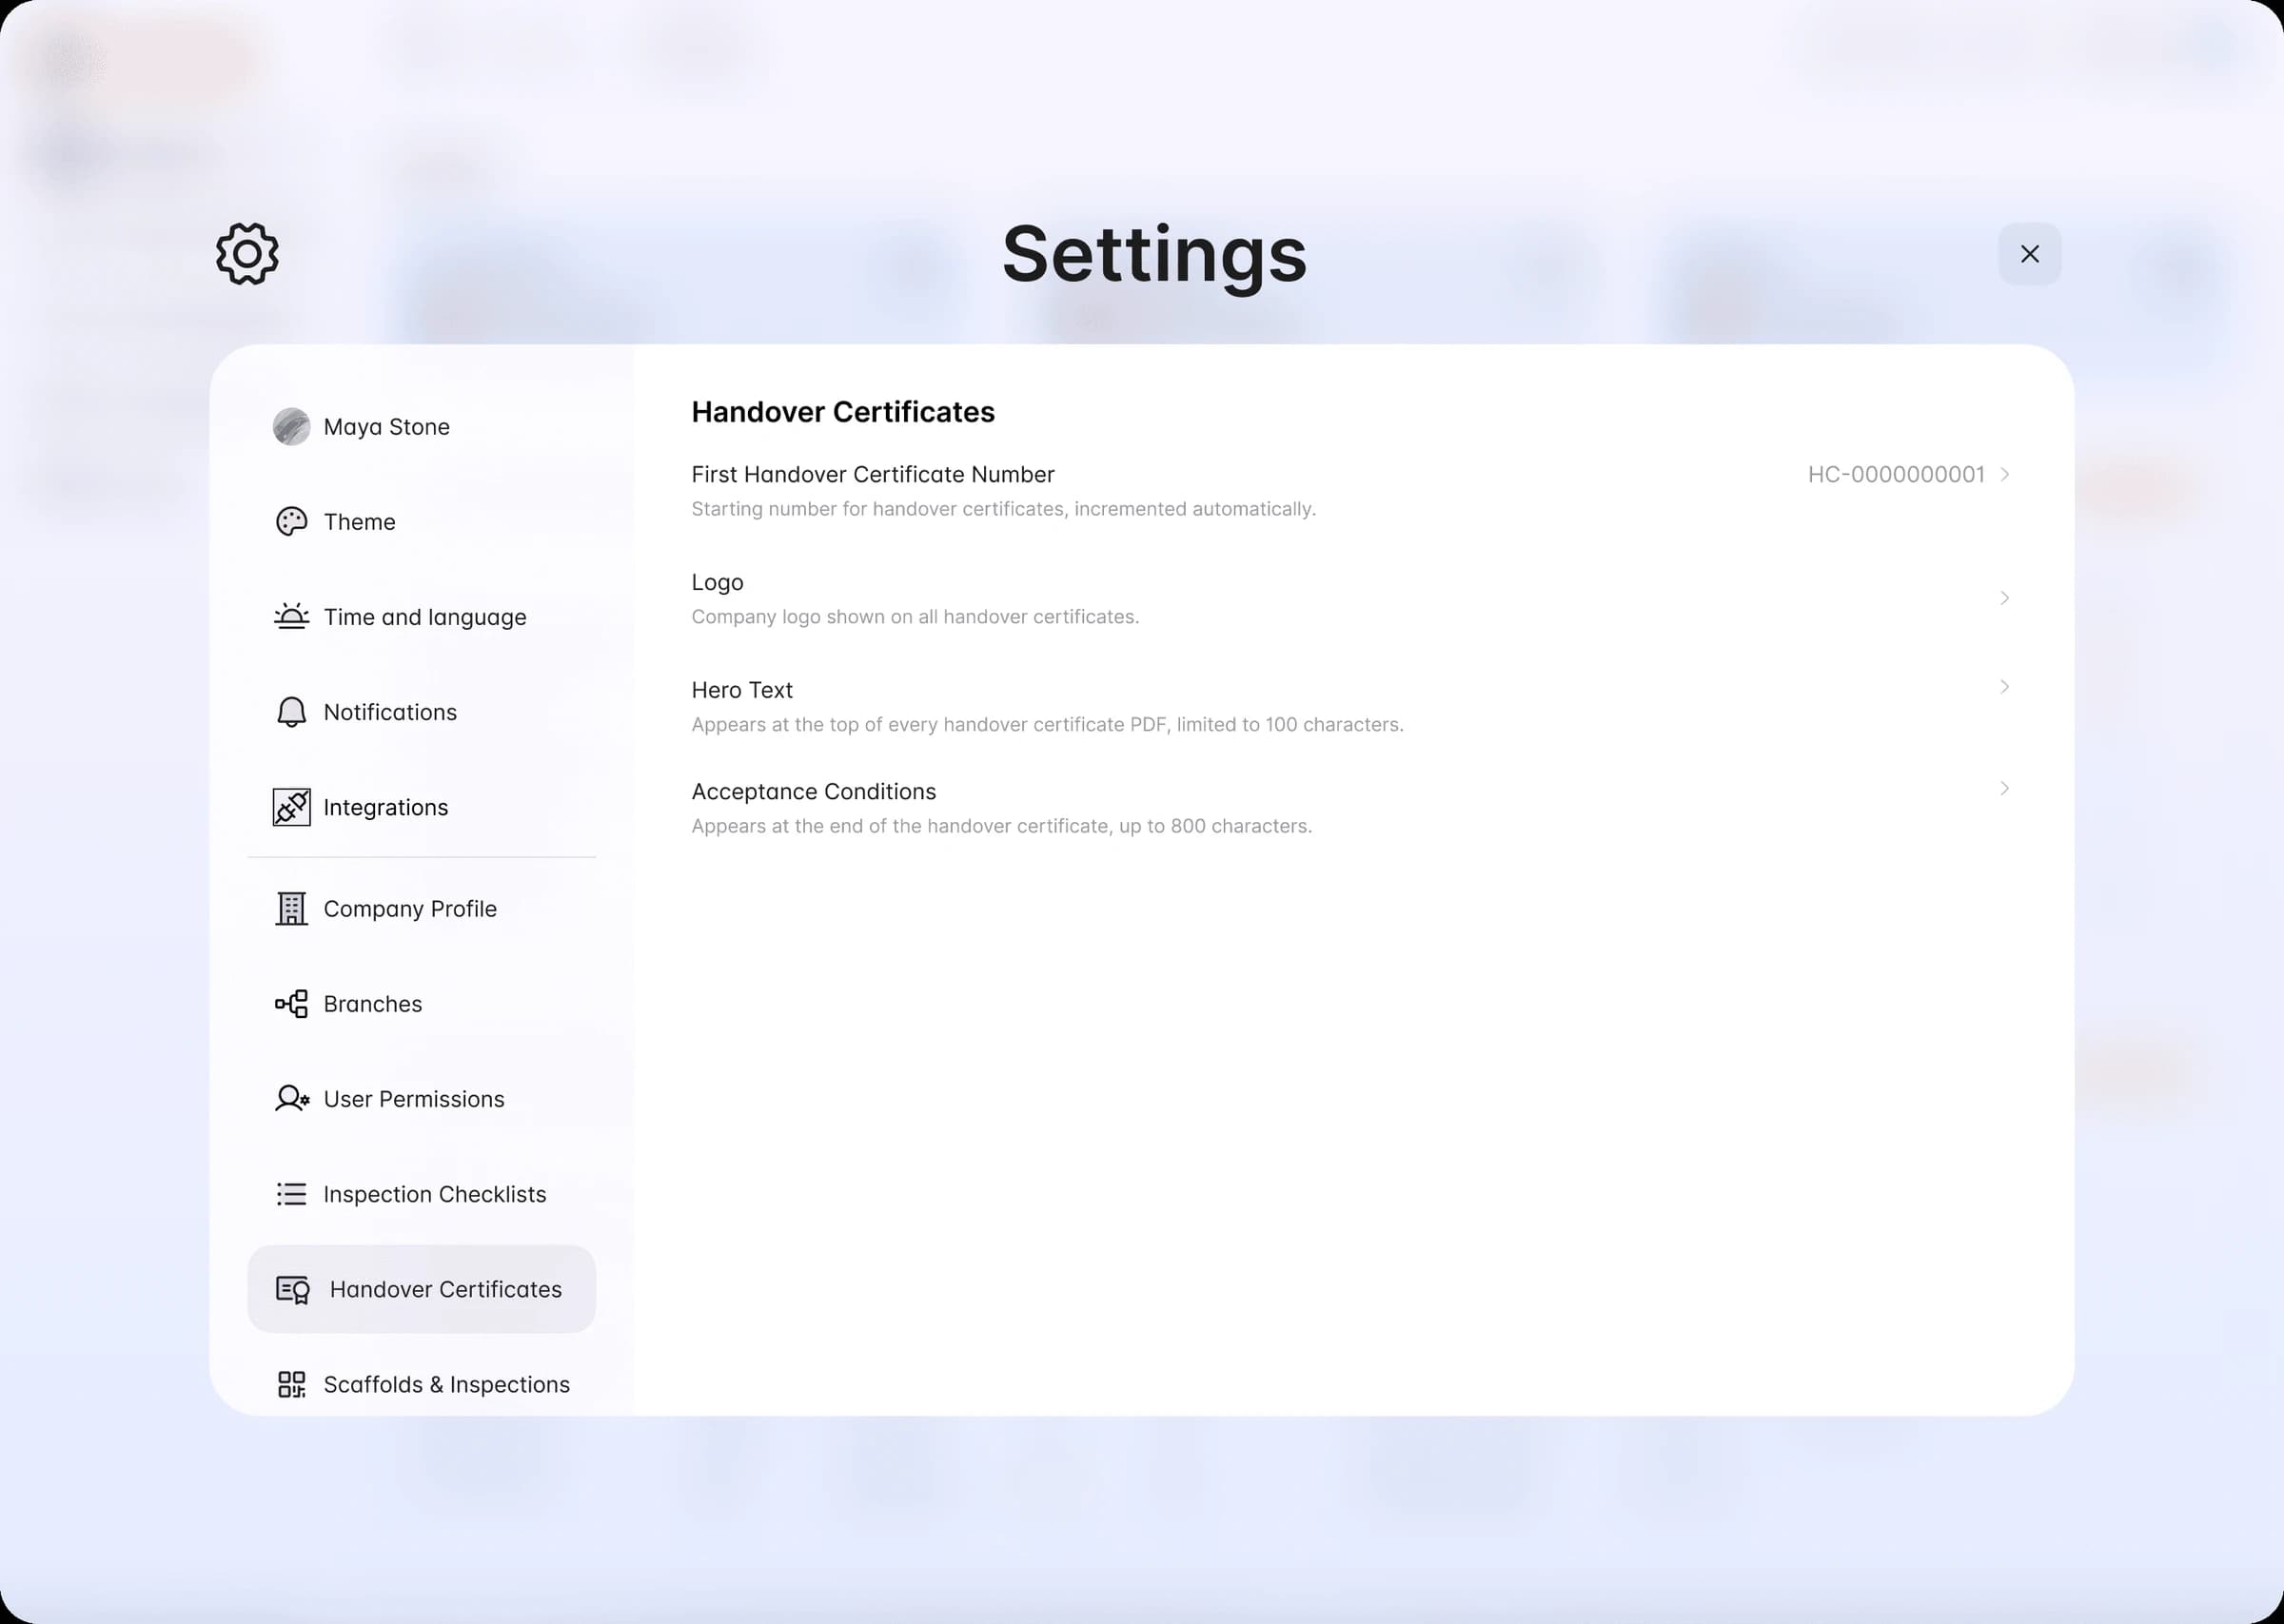
The Settings window opens. In the left-hand menu, under Organization Settings, click Handover Certificates.

This page holds everything that appears on your certificates: the certificate number, the logo, the hero text, and the acceptance conditions.

The small thumbnail to the right of the Logo row shows your current logo. If you've never set one, you'll see a plain image icon there instead.

Step 3: Open the Logo setting

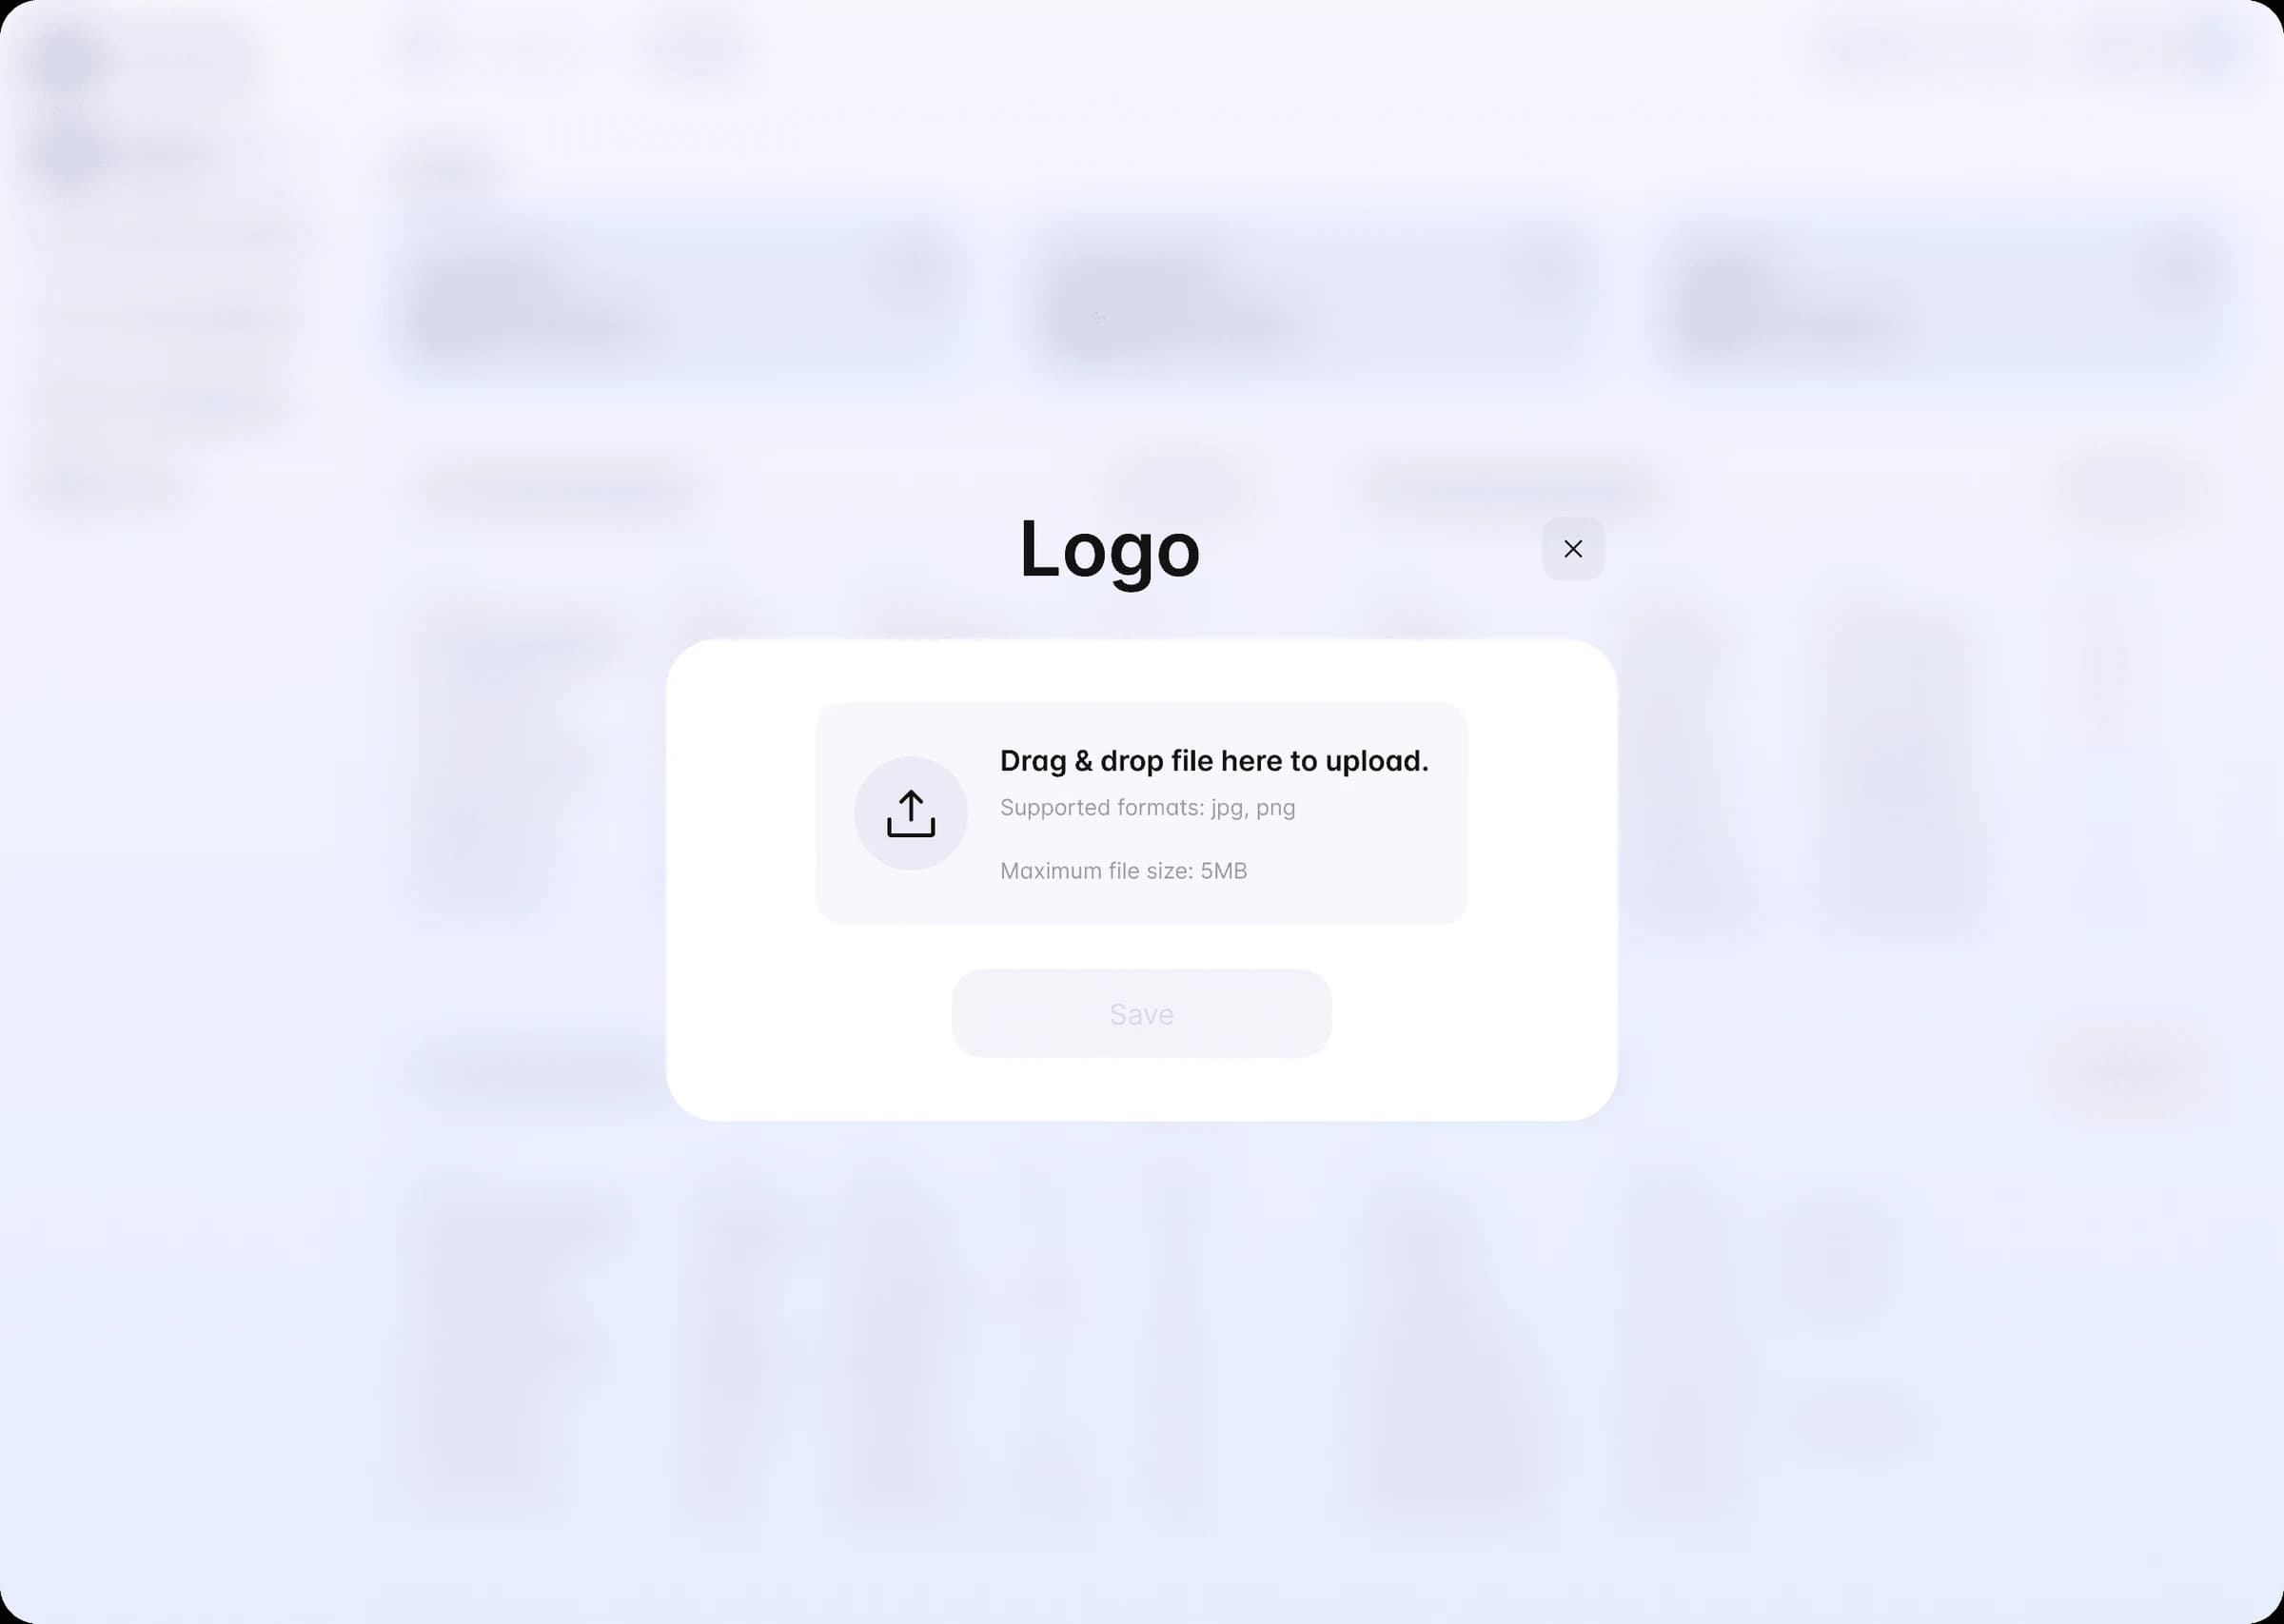
Click the Logo row.

Your current logo appears at the top of the upload area (if you've uploaded a logo previously).

Step 4: Add your new logo

Add your file in either of two ways:

  • Drag and drop your image file onto the dashed upload area, or

  • Click the dashed area to open your computer's file browser, then choose your file.

Once your file is accepted, the Save button turns solid blue to show it's ready.
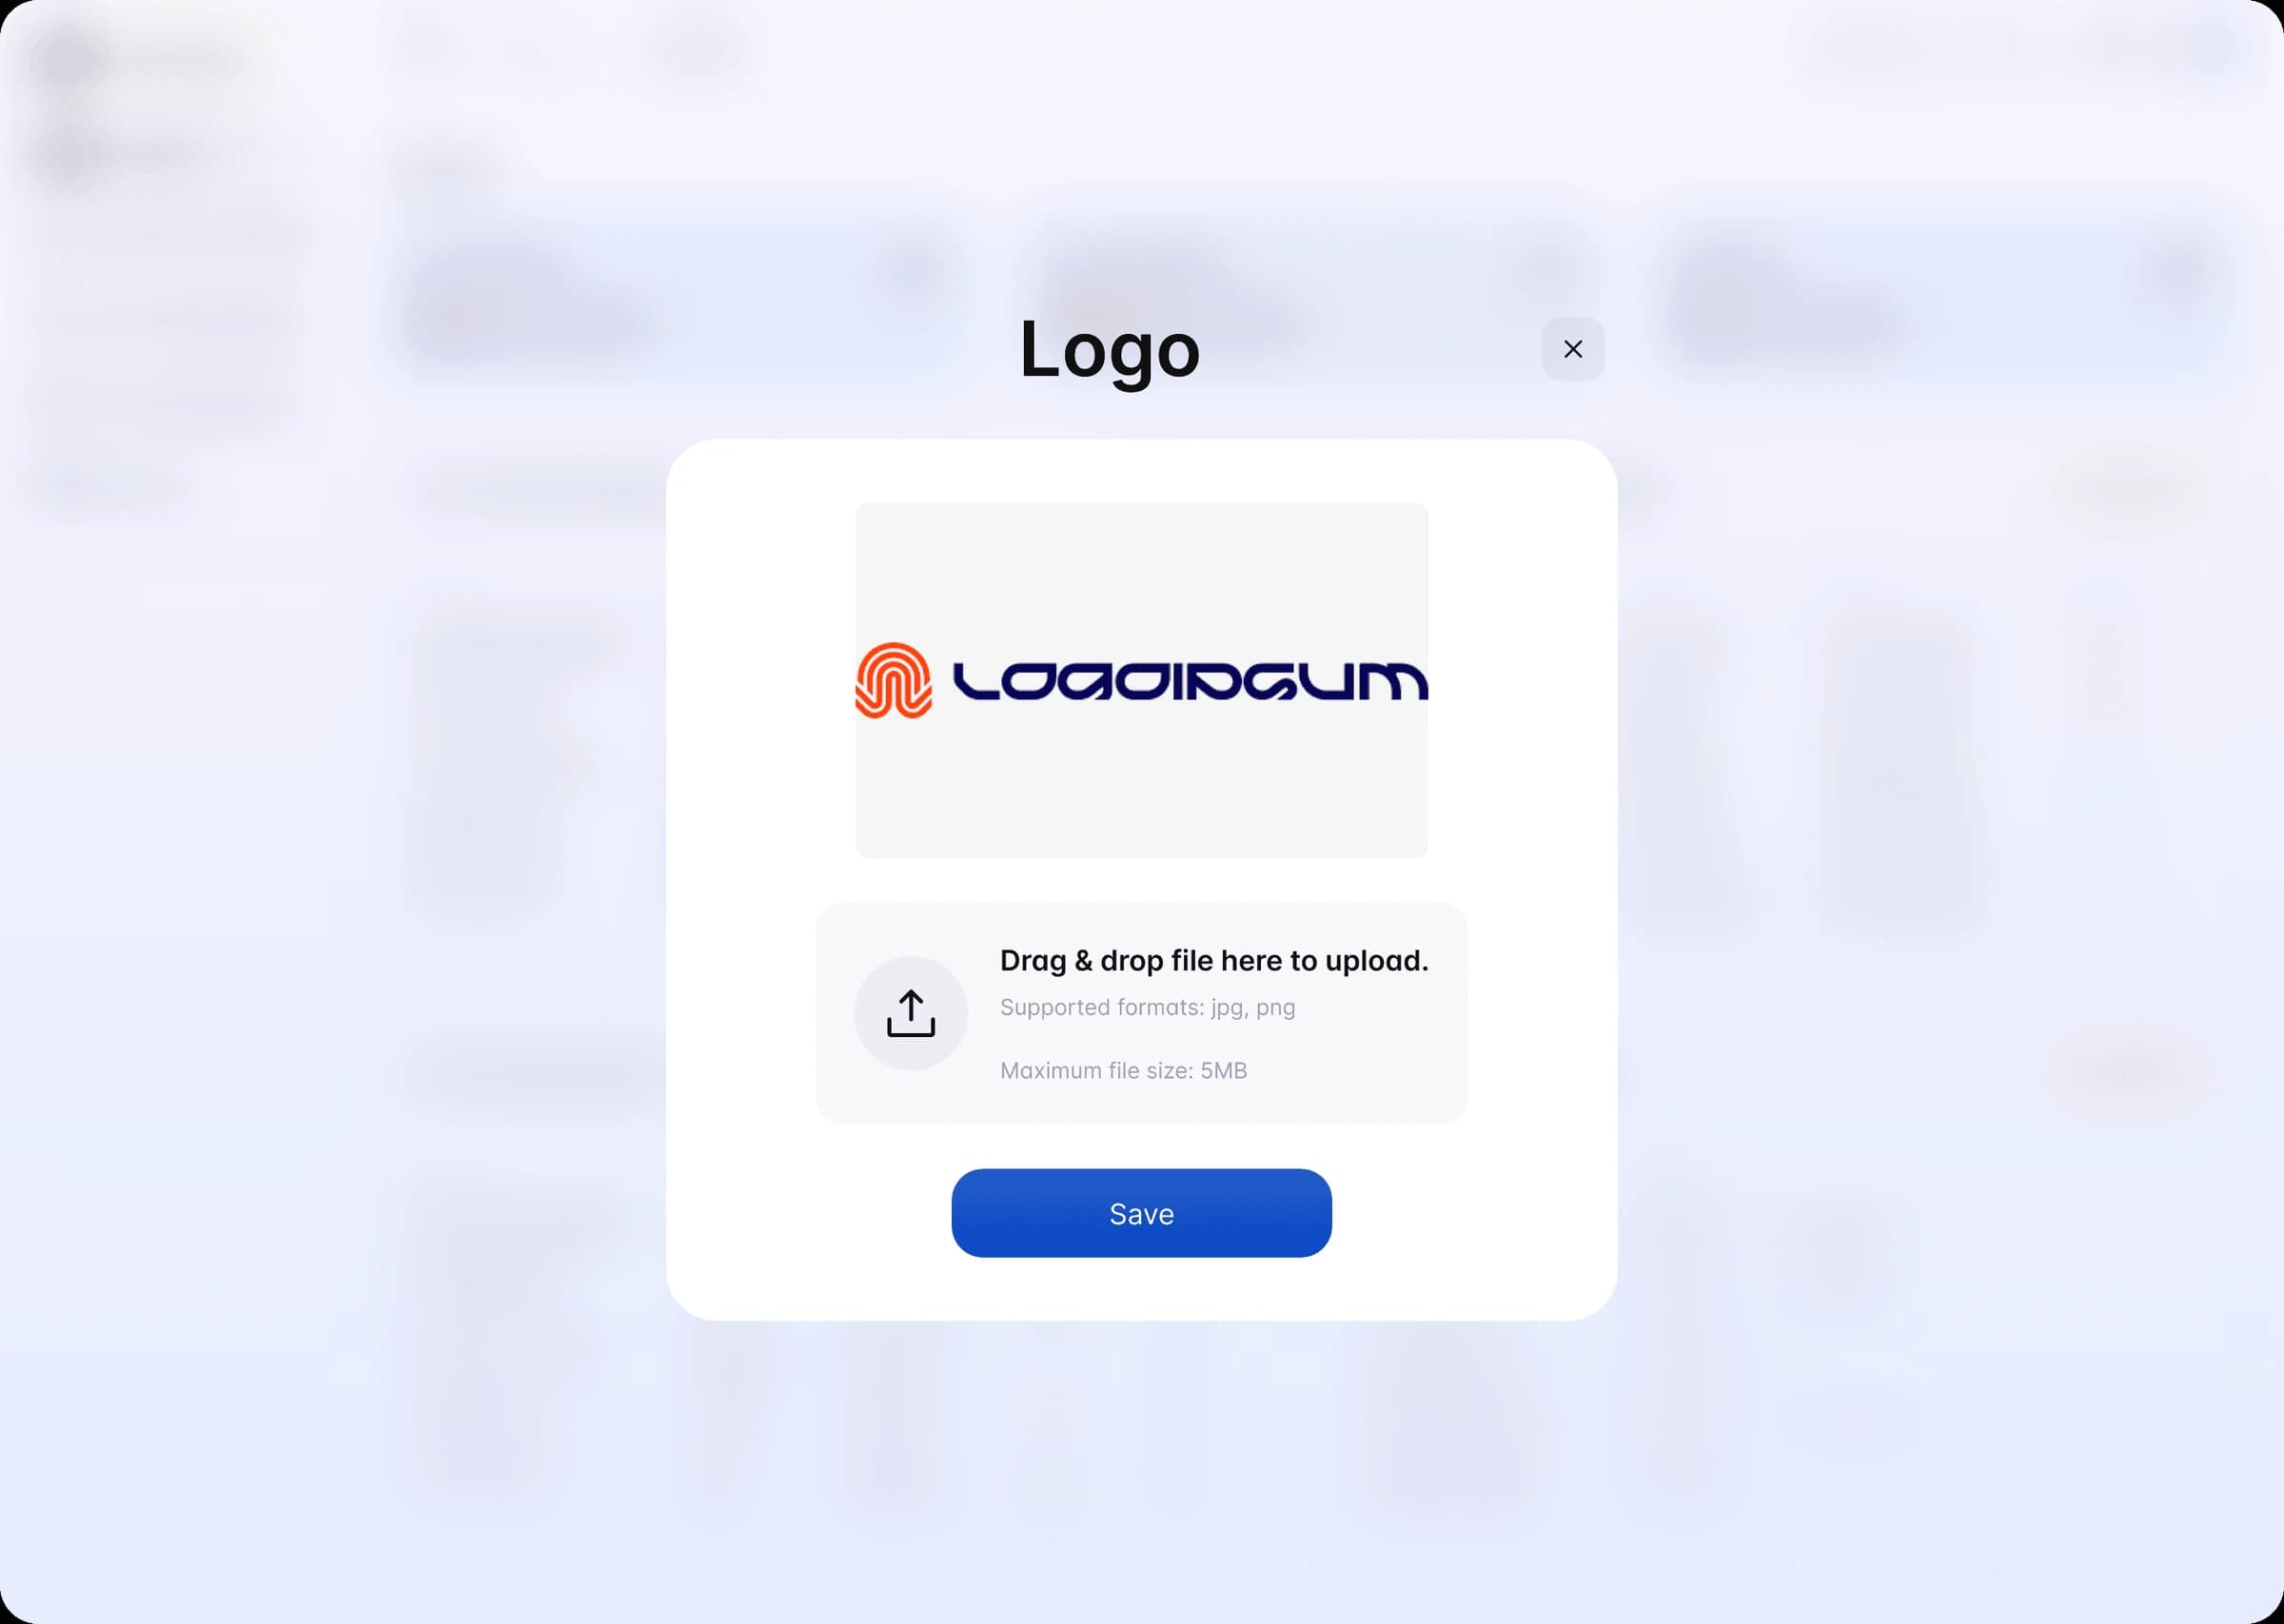
Nothing has been saved yet. Your new logo doesn't go live until you complete Step 5. To start over, close the window without saving.

Step 5: Save

Click Save.

The button shows a loading spinner while your logo uploads. When it's done, the window returns to the Handover Certificates list and a confirmation appears:

✅ Handover certificate info saved successfully.

The thumbnail in the Logo row now shows your new logo.
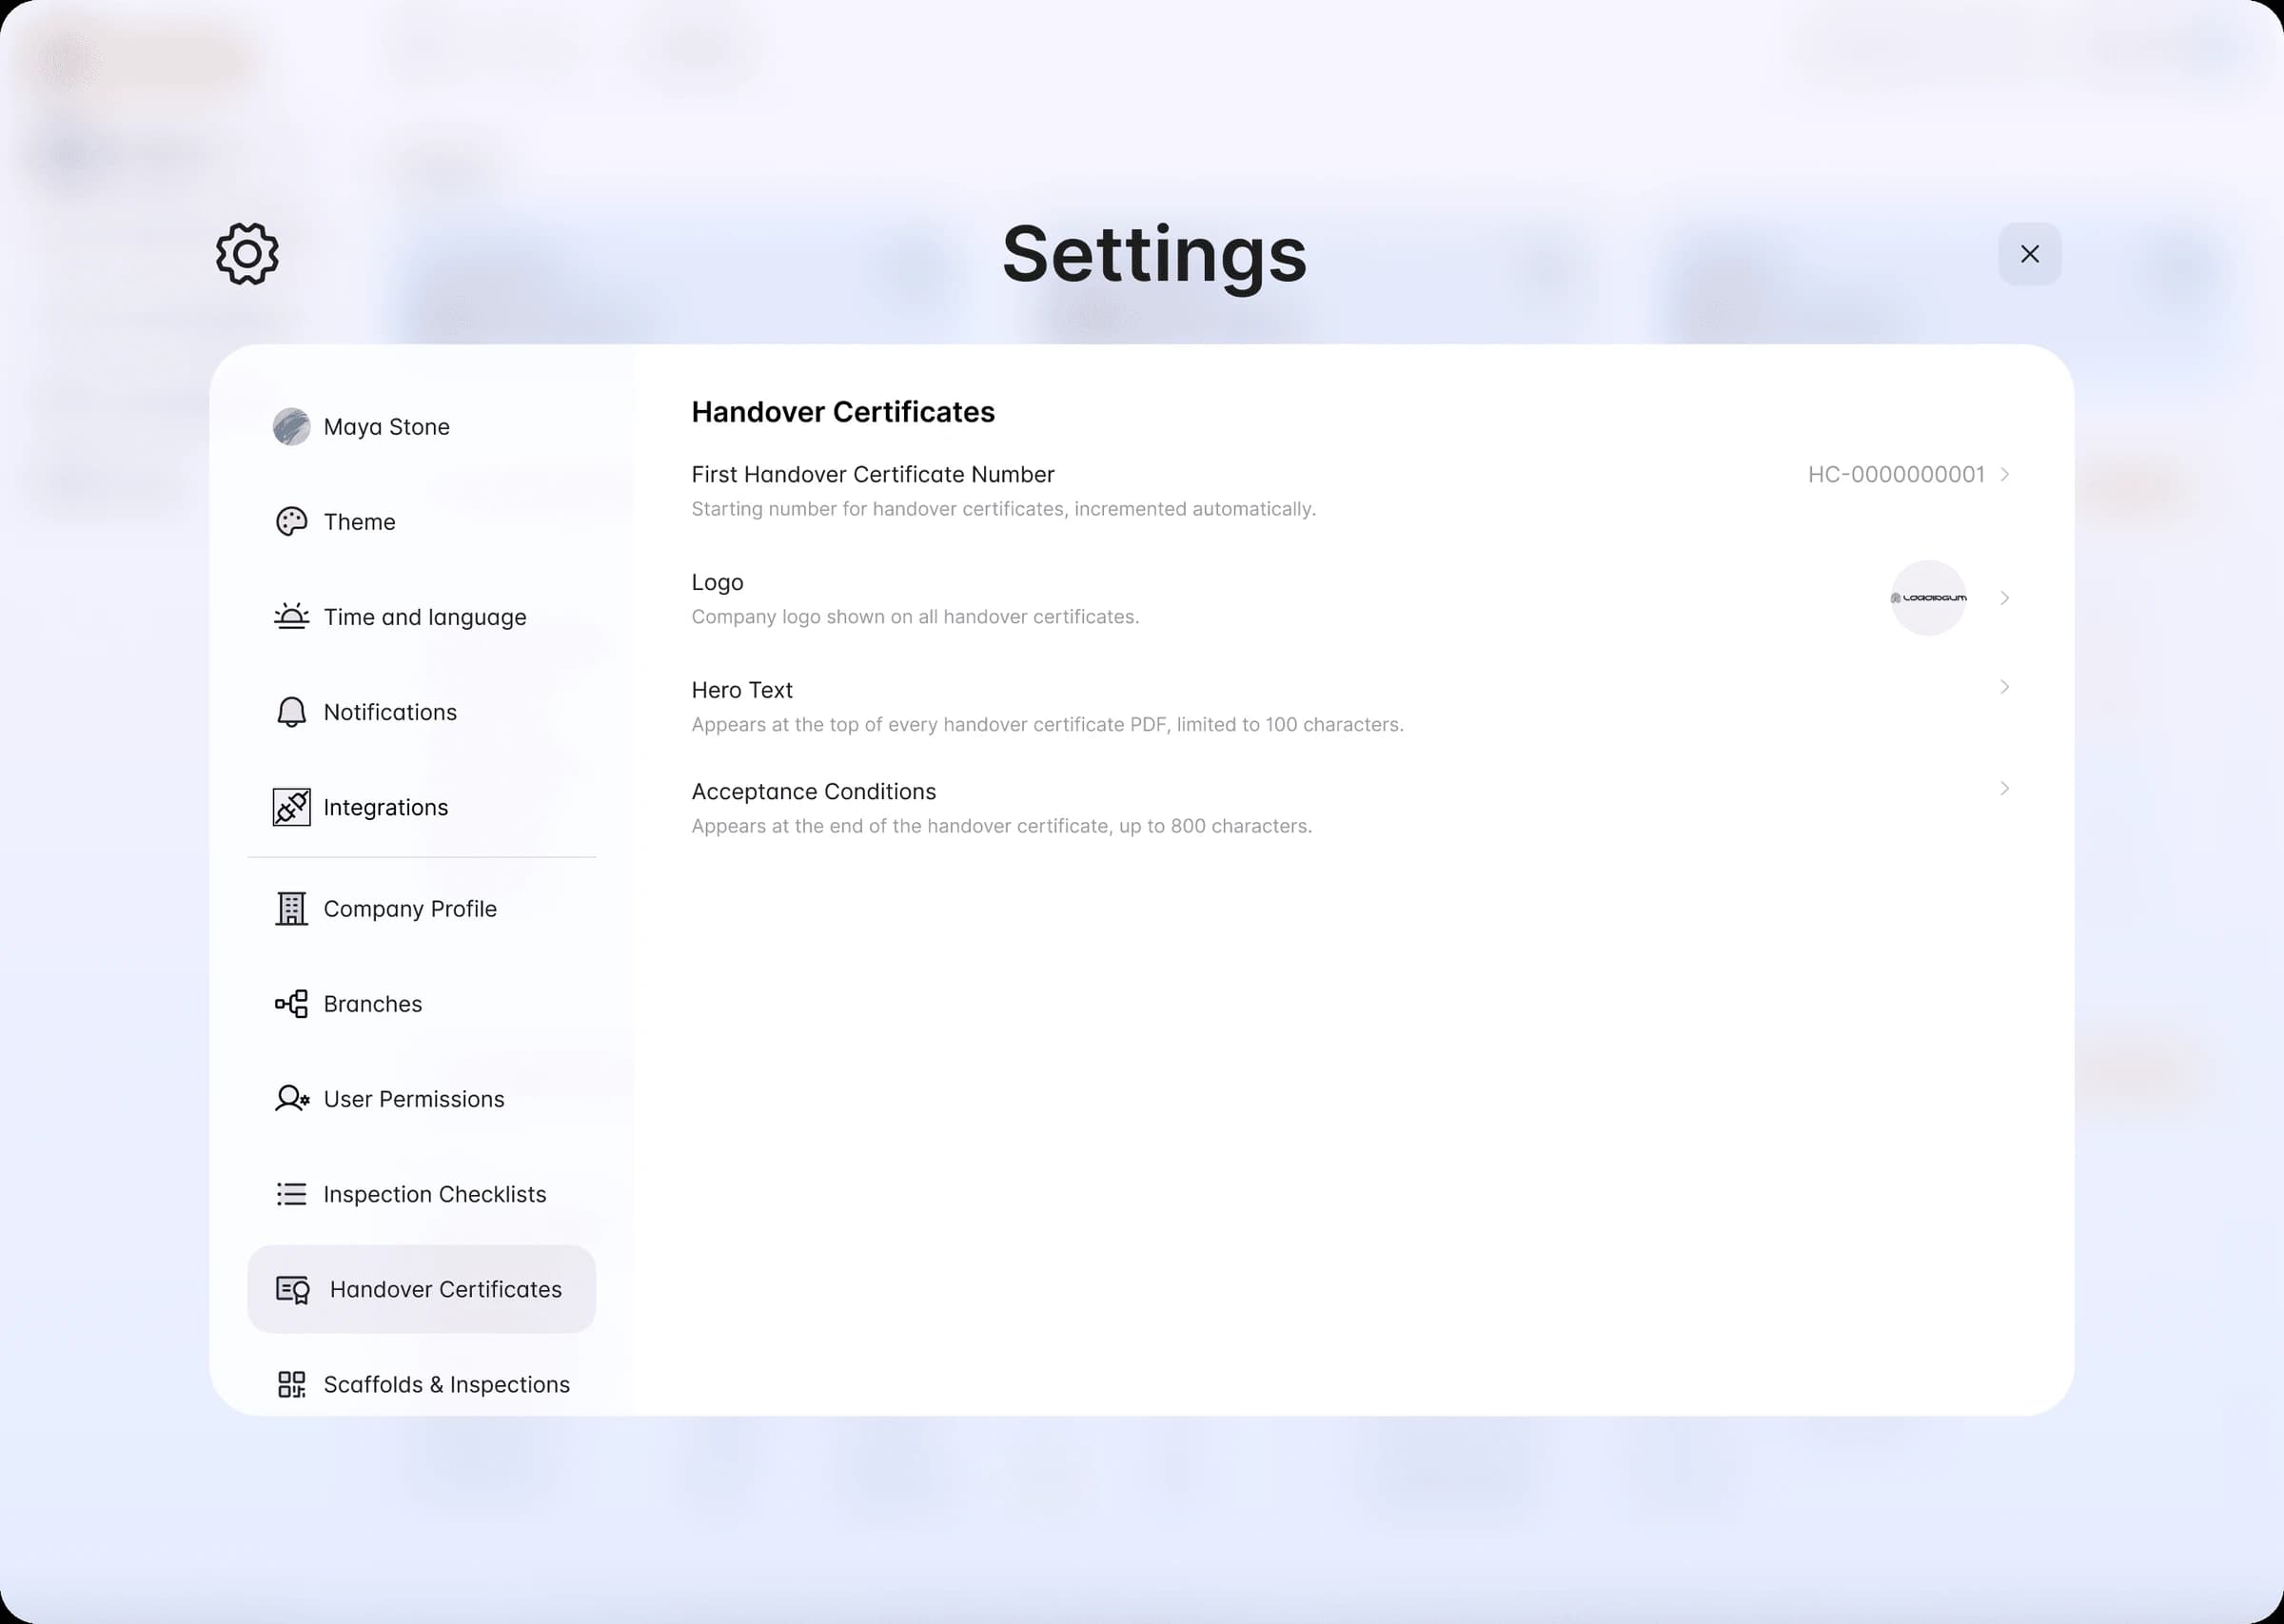
Your new logo is now in place and will be used on the handover certificates you generate from here on.

Removing your logo without replacing it

To have no logo on your certificates at all:

  1. Follow Steps 1–3 to open the Logo window.

  2. Click the in the top-right corner of your current logo.

  3. Click Save.

Your certificates will then be generated without a logo.

Troubleshooting

"Unsupported format: …"
Your file isn't one of the accepted image types. This most often happens with SVG, PDF, HEIC, or TIFF files. Convert or export your logo as a PNG or JPG and try again.

"File exceeds 5MB limit"
Your image file is too large. Save it at a lower quality, or resize it closer to 600 × 600 pixels, then try again.

"Failed to upload logo."
Something went wrong sending the file to Scafflinq. Check your internet connection and try again. If it keeps happening, contact support.

The Save button stays greyed out
Save only becomes active once you've actually chosen a new file. If you've just opened the window and haven't picked anything yet, there's nothing to save.

I can't find Handover Certificates in Settings
This section is only visible to Company Admins. Ask a Company Admin at your organization to make the change for you.

Frequently asked questions

Does this change certificates I've already issued?

The logo applies to certificates generated from the point you save it onward. If you need a previously issued certificate reissued with your new logo, contact support.

Can I use a different logo for each branch or project?

Not currently. The logo is a single organization-wide setting that applies to all handover certificates your company issues.

Where else does this logo appear?

This setting controls the logo on your handover certificates only. It's separate from your company profile and from the Scafflinq branding you see in the app itself.

What are Hero Text and Acceptance Conditions?

They control other parts of the certificate — a line of text at the top of the PDF (up to 100 characters) and the acceptance wording at the end (up to 800 characters). You change them the same way, from the same settings page.

How to change the logo on your handover certificate

Your company logo appears on every handover certificate Scafflinq generates. You can replace it at any time from your organization settings — it takes about a minute.

Who can do this: Company Admins only. If you can't find the Handover Certificates section described below, your account doesn't have the right permission level. Ask a Company Admin at your organization to make the change for you.

Before you start: prepare your logo file

Getting the file right first makes the rest of this quick.


Accepted formats

JPG, JPEG, PNG, WEBP, GIF

Maximum file size

5 MB

Recommended dimensions

600 × 600 pixels or smaller

A few tips:

  • A PNG with a transparent background usually looks best, since it sits cleanly on the white certificate page.

  • Keep the image close to the recommended 600 × 600 size. Very large images make your certificate PDFs slower to generate and heavier to email, and they won't look any sharper on the finished document.

  • Vector and document files aren't supported. If your logo is an SVG, PDF, or EPS — which is common when it comes straight from a designer — export it as a PNG first.

To check your logo's dimensions:

  • Windows — right-click the file → PropertiesDetails

  • Mac — right-click the file → Get Info

To resize, use Paint on Windows (ResizePixels) or Preview on Mac (ToolsAdjust Size).

Step 1: Open your settings

From anywhere in the Scafflinq dashboard, click the gear icon in the top-right of the header — it sits between the help (?) icon and your profile initial.

Step 2: Go to Handover Certificates

The Settings window opens. In the left-hand menu, under Organization Settings, click Handover Certificates.

This page holds everything that appears on your certificates: the certificate number, the logo, the hero text, and the acceptance conditions.

The small thumbnail to the right of the Logo row shows your current logo. If you've never set one, you'll see a plain image icon there instead.

Step 3: Open the Logo setting

Click the Logo row.

Your current logo appears at the top of the upload area (if you've uploaded a logo previously).

Step 4: Add your new logo

Add your file in either of two ways:

  • Drag and drop your image file onto the dashed upload area, or

  • Click the dashed area to open your computer's file browser, then choose your file.

Once your file is accepted, the Save button turns solid blue to show it's ready.

Nothing has been saved yet. Your new logo doesn't go live until you complete Step 5. To start over, close the window without saving.

Step 5: Save

Click Save.

The button shows a loading spinner while your logo uploads. When it's done, the window returns to the Handover Certificates list and a confirmation appears:

✅ Handover certificate info saved successfully.

The thumbnail in the Logo row now shows your new logo.

Your new logo is now in place and will be used on the handover certificates you generate from here on.

Removing your logo without replacing it

To have no logo on your certificates at all:

  1. Follow Steps 1–3 to open the Logo window.

  2. Click the in the top-right corner of your current logo.

  3. Click Save.

Your certificates will then be generated without a logo.

Troubleshooting

"Unsupported format: …"
Your file isn't one of the accepted image types. This most often happens with SVG, PDF, HEIC, or TIFF files. Convert or export your logo as a PNG or JPG and try again.

"File exceeds 5MB limit"
Your image file is too large. Save it at a lower quality, or resize it closer to 600 × 600 pixels, then try again.

"Failed to upload logo."
Something went wrong sending the file to Scafflinq. Check your internet connection and try again. If it keeps happening, contact support.

The Save button stays greyed out
Save only becomes active once you've actually chosen a new file. If you've just opened the window and haven't picked anything yet, there's nothing to save.

I can't find Handover Certificates in Settings
This section is only visible to Company Admins. Ask a Company Admin at your organization to make the change for you.

Frequently asked questions

Does this change certificates I've already issued?

The logo applies to certificates generated from the point you save it onward. If you need a previously issued certificate reissued with your new logo, contact support.

Can I use a different logo for each branch or project?

Not currently. The logo is a single organization-wide setting that applies to all handover certificates your company issues.

Where else does this logo appear?

This setting controls the logo on your handover certificates only. It's separate from your company profile and from the Scafflinq branding you see in the app itself.

What are Hero Text and Acceptance Conditions?

They control other parts of the certificate — a line of text at the top of the PDF (up to 100 characters) and the acceptance wording at the end (up to 800 characters). You change them the same way, from the same settings page.

© 2026 Construction Tag Technologies Pty Ltd.
All Rights Reserved.

Back to top

© 2026 Construction Tag Technologies Pty Ltd.
All Rights Reserved.

Back to top

© 2026 Construction Tag Technologies Pty Ltd.
All Rights Reserved.

Back to top